Archive for the ‘personal-ramblings’ Category

BlueOS 1.16.2

Saturday, May 9th, 2015

Downloaded. Installed. And gained access to the root prompt. All in 5 minutes. I really should do something about the perl decryption though.

And to the ones mailing me about my BlueOS root access backdoor. Well, I will not inform how I do it, because then it will be closed in matter of minutes with a new maintenance release from Bluesound :-). That said, injecting a new password hash into the recovery iso, while not for scriptkiddies, are not that much trouble and should take an educated fellow less than a couple of hours work.

Geek review of Bluesound Node

Monday, December 30th, 2013

I recently reviewed the Bluesound Node from a end user perspective. It rocks the house, so to speak.

The geek in me would not and could not let that be the end of it. How is it built? What makes it tick? Stuff like that.

A quick nmap of the box yields

[code]

edison% nmap 192.168.1.119

Starting Nmap 5.00 ( http://nmap.org ) at 2013-12-30 19:37 CET
Interesting ports on 192.168.1.119:
Not shown: 998 closed ports
PORT   STATE SERVICE
22/tcp open  ssh
80/tcp open  http

Nmap done: 1 IP address (1 host up) scanned in 2.71 seconds
[/code]

The webserver serves some very minimal pages. Most interessting are the diagnostics pages. The advanced tab, actually serves the output of dmesg and /var/log/messages, so obviously linux inside.

A lot could be deduced from the output of dmesg alone, but being a geek I wanted to know everything.  A quick test with root/root and whats not yielded nothing using ssh. Actually the user/user combo works wrt. authorization, but fails due to the fact that /home/user does not exists.

On the back of the node there are a mini usb for support. Obviously that is a console port. I tried to play around with that a bit, but no obvious way in, except knowing the root password.

I then used a couple of hours of my life and figured out how to gain access without knowing the root password. The details will be kept off the net. You have to figure it out yourself.

But in the end

[code]
root@Stue ~$ uname -a
Linux Stue 2.6.35.3-998-ga1cd8a7 #117 PREEMPT Tue Dec 3 16:51:52 EST 2013 armv7l GNU/Linux
root@Stue ~$ cat /proc/cpuinfo
Processor       : ARMv7 Processor rev 5 (v7l)
BogoMIPS        : 799.53
Features        : swp half thumb fastmult vfp edsp neon vfpv3
CPU implementer : 0x41
CPU architecture: 7
CPU variant     : 0x2
CPU part        : 0xc08
CPU revision    : 5

Hardware        : NAD SOVI Board
Revision        : 51030
Serial          : 0000000000000000
root@Stue ~$ cat /proc/meminfo  | head -10
MemTotal:         254980 kB
MemFree:           83216 kB
Buffers:            7856 kB
Cached:            76932 kB
SwapCached:            0 kB
Active:            99812 kB
Inactive:          60908 kB
Active(anon):      75948 kB
Inactive(anon):      312 kB
Active(file):      23864 kB

[    0.000000] Linux version 2.6.35.3-998-ga1cd8a7 (kg@ubuntu) (gcc version 4.4.4 (4.4.4_09.06.2010) ) #117 PREEMPT Tue Dec 3 16:51:52 EST 2013
[    0.000000] CPU: ARMv7 Processor [412fc085] revision 5 (ARMv7), cr=10c53c7f
[    0.000000] CPU: VIPT nonaliasing data cache, VIPT nonaliasing instruction cache
[    0.000000] Machine: NAD SOVI Board
[    0.000000] Memory policy: ECC disabled, Data cache writeback
[    0.000000] On node 0 totalpages: 65536
[    0.000000] free_area_init_node: node 0, pgdat 804c0634, node_mem_map 804eb000
[    0.000000]   DMA zone: 192 pages used for memmap
[    0.000000]   DMA zone: 0 pages reserved
[    0.000000]   DMA zone: 24384 pages, LIFO batch:3
[    0.000000]   Normal zone: 320 pages used for memmap
[    0.000000]   Normal zone: 40640 pages, LIFO batch:7
[    0.000000] Built 1 zonelists in Zone order, mobility grouping on.  Total pages: 65024
[    0.000000] Kernel command line: console=ttymxc0,115200 root=/dev/mmcblk0p2 rootwait ro rootfstype=ext4
[    0.000000] PID hash table entries: 1024 (order: 0, 4096 bytes)
[    0.000000] Dentry cache hash table entries: 32768 (order: 5, 131072 bytes)
[    0.000000] Inode-cache hash table entries: 16384 (order: 4, 65536 bytes)
[    0.000000] Memory: 256MB = 256MB total
[    0.000000] Memory: 254868k/254868k available, 7276k reserved, 0K highmem
[    0.000000] Virtual kernel memory layout:
[    0.000000]     vector  : 0xffff0000 – 0xffff1000   (   4 kB)
[    0.000000]     fixmap  : 0xfff00000 – 0xfffe0000   ( 896 kB)
[    0.000000]     DMA     : 0xf9e00000 – 0xffe00000   (  96 MB)
[    0.000000]     vmalloc : 0x90800000 – 0xf4000000   (1592 MB)
[    0.000000]     lowmem  : 0x80000000 – 0x90000000   ( 256 MB)
[    0.000000]     modules : 0x7f000000 – 0x80000000   (  16 MB)
[    0.000000]       .init : 0x80008000 – 0x80024000   ( 112 kB)
[    0.000000]       .text : 0x80024000 – 0x8046a000   (4376 kB)
[    0.000000]       .data : 0x80484000 – 0x804c1040   ( 245 kB)
[    0.000000] SLUB: Genslabs=11, HWalign=32, Order=0-3, MinObjects=0, CPUs=1, Nodes=1
[    0.000000] Hierarchical RCU implementation.
[    0.000000]  RCU-based detection of stalled CPUs is disabled.
[    0.000000]  Verbose stalled-CPUs detection is disabled.
[    0.000000] NR_IRQS:272
[    0.000000] MXC GPIO hardware
[    0.000000] MXC IRQ initialized
[    0.000000] MXC_Early serial console at MMIO 0x73fbc000 (options ‘115200’)
[    0.000000] bootconsole [ttymxc0] enabled
[    0.000000] Console: colour dummy device 80×30
[    0.475328] Calibrating delay loop… 799.53 BogoMIPS (lpj=3997696)
[    0.703896] pid_max: default: 32768 minimum: 301
[    0.707706] Security Framework initialized
[    0.711075] Mount-cache hash table entries: 512
[    0.715116] CPU: Testing write buffer coherency: ok
[    0.722633] regulator: core version 0.5
[    0.726039] NET: Registered protocol family 16
[    0.729770] i.MX IRAM pool: 128 KB@0x90840000
[    0.733448] IRAM READY
[    0.737156] CPU is i.MX51 Revision 3.0
[    0.780569] Using SDMA I.API
[    0.783084] MXC DMA API initialized
[    0.786395] IMX usb wakeup probe
[    0.789124] the wakeup pdata is 0x80490eb8
[    0.789147] IMX usb wakeup probe
[    0.791858] the wakeup pdata is 0x80490f6c
[    0.801784] bio: create slab <bio-0> at 0
[    0.806432] SCSI subsystem initialized
[    0.810273] CSPI: mxc_spi-0 probed
[    0.813554] Freescale USB OTG Driver loaded, $Revision: 1.55 $
[    0.928925] usbcore: registered new interface driver usbfs
[    0.933645] usbcore: registered new interface driver hub
[    0.938140] usbcore: registered new device driver usb
[    0.944076] Advanced Linux Sound Architecture Driver Version 1.0.23.
[    0.949939] mc13892 Rev 2.4 FinVer 2 detected
[    0.953900] Initializing regulators for NAD SOVI.
[    0.958842] regulator: SW1: 600 <–> 1375 mV at 1050 mV
[    0.963928] regulator: SW2: 900 <–> 1850 mV at 1225 mV
[    0.968760] regulator: SW3: 1100 <–> 1850 mV at 1200 mV
[    0.973686] regulator: SW4: 1100 <–> 1850 mV at 1800 mV
[    0.978440] regulator: SWBST:
[    0.981374] regulator: VIOHI:
[    0.984427] regulator: VPLL: 1050 <–> 1800 mV at 1800 mV
[    0.989364] regulator: VDIG: 1650 mV
[    0.992759] regulator: VSD: 1800 <–> 3150 mV at 3150 mV
[    0.997744] regulator: VUSB2: 2400 <–> 2775 mV at 2600 mV
[    1.002851] regulator: VVIDEO: 2775 mV
[    1.006396] regulator: VAUDIO: 2300 <–> 3000 mV at 3000 mV
[    1.011495] regulator: VCAM: 2500 <–> 3000 mV at 2600 mV fast normal
[    1.017172] regulator: VGEN1: 1200 mV
[    1.020756] regulator: VGEN2: 1200 <–> 3150 mV at 3150 mV
[    1.025887] regulator: VGEN3: 1800 <–> 2900 mV at 1800 mV
[    1.030904] regulator: VUSB:
[    1.033666] regulator: GPO1:
[    1.036497] regulator: GPO2:
[    1.039256] regulator: GPO3:
[    1.042029] regulator: GPO4:
[    1.045666] Device spi1.0 probed
[    1.048528] Switching to clocksource mxc_timer1
[    1.053749] NET: Registered protocol family 2
[    1.057403] IP route cache hash table entries: 2048 (order: 1, 8192 bytes)
[    1.063405] TCP established hash table entries: 8192 (order: 4, 65536 bytes)
[    1.069284] TCP bind hash table entries: 8192 (order: 3, 32768 bytes)
[    1.074643] TCP: Hash tables configured (established 8192 bind 8192)
[    1.079822] TCP reno registered
[    1.082401] UDP hash table entries: 256 (order: 0, 4096 bytes)
[    1.087167] UDP-Lite hash table entries: 256 (order: 0, 4096 bytes)
[    1.092389] NET: Registered protocol family 1
[    1.096156] RPC: Registered udp transport module.
[    1.099992] RPC: Registered tcp transport module.
[    1.103922] RPC: Registered tcp NFSv4.1 backchannel transport module.
[    1.109898] LPMode driver module loaded
[    1.113096] Static Power Management for Freescale i.MX5
[    1.117591] PM driver module loaded
[    1.120606] sdram autogating driver module loaded
[    1.124745] Bus freq driver module loaded
[    1.128048] mxc_dvfs_core_probe
[    1.130828] DVFS driver module loaded
[    1.133869] i.MXC CPU frequency driver
[    1.137356] DVFS PER driver module loaded
[    1.155861] Installing knfsd (copyright (C) 1996 okir@monad.swb.de).
[    1.162207] Slow work thread pool: Starting up
[    1.166497] Slow work thread pool: Ready
[    1.169698] NTFS driver 2.1.29 [Flags: R/O].
[    1.173852] fuse init (API version 7.14)
[    1.177767] msgmni has been set to 497
[    1.183015] alg: No test for stdrng (krng)
[    1.186600] cryptodev: driver loaded.
[    1.189620] io scheduler noop registered
[    1.192902] io scheduler deadline registered
[    1.196489] io scheduler cfq registered (default)
[    1.439983] Serial: MXC Internal UART driver
[    1.443824] mxcintuart.0: ttymxc0 at MMIO 0x73fbc000 (irq = 31) is a Freescale i.MX
[    1.450099] console [ttymxc0] enabled, bootconsole disabled
[    1.462182] mxcintuart.1: ttymxc1 at MMIO 0x73fc0000 (irq = 32) is a Freescale i.MX
[    1.470812] mxcintuart.2: ttymxc2 at MMIO 0x7000c000 (irq = 33) is a Freescale i.MX
[    1.483203] loop: module loaded
[    1.486775] FEC Ethernet Driver
[    1.493082] fec_enet_mii_bus: probed
[    1.497306] ehci_hcd: USB 2.0 ‘Enhanced’ Host Controller (EHCI) Driver
[    1.504066] fsl-ehci fsl-ehci.0: Freescale On-Chip EHCI Host Controller
[    1.510711] fsl-ehci fsl-ehci.0: new USB bus registered, assigned bus number 1
[    1.542280] fsl-ehci fsl-ehci.0: irq 18, io base 0x73f80000
[    1.562251] fsl-ehci fsl-ehci.0: USB 2.0 started, EHCI 1.00
[    1.568937] hub 1-0:1.0: USB hub found
[    1.572760] hub 1-0:1.0: 1 port detected
[    1.792258] fsl-ehci fsl-ehci.1: Freescale On-Chip EHCI Host Controller
[    1.798907] fsl-ehci fsl-ehci.1: new USB bus registered, assigned bus number 2
[    1.832279] fsl-ehci fsl-ehci.1: irq 14, io base 0x73f80200
[    1.852257] fsl-ehci fsl-ehci.1: USB 2.0 started, EHCI 1.00
[    1.858786] hub 2-0:1.0: USB hub found
[    1.862596] hub 2-0:1.0: 1 port detected
[    1.867015] Initializing USB Mass Storage driver…
[    1.872131] usbcore: registered new interface driver usb-storage
[    1.878187] USB Mass Storage support registered.
[    1.882826] ARC USBOTG Device Controller driver (1 August 2005)
[    1.889550] input: gpio-keys as /devices/platform/gpio-keys/input/input0
[    1.897518] pmic rtc probe start
[    1.901432] pmic_rtc mc13892_rtc.1: rtc core: registered mc13892_rtc as rtc0
[    1.908562] pmic rtc probe succeed
[    1.912319] IR NEC protocol handler initialized
[    1.916856] IR RC5(x) protocol handler initialized
[    1.921650] IR RC6 protocol handler initialized
[    1.926214] IR JVC protocol handler initialized
[    1.930748] IR Sony protocol handler initialized
[    1.935382] MXC WatchDog Driver 2.0
[    1.939394] MXC Watchdog # 0 Timer: initial timeout 60 sec
[    1.946510] mxsdhci: MXC Secure Digital Host Controller Interface driver
[    1.953319] mxsdhci: MXC SDHCI Controller Driver.
[    1.958952] mmc0: SDHCI detect irq 128 irq 1 INTERNAL DMA
[    1.964444] mxsdhci: MXC SDHCI Controller Driver.
[    1.969706] mmc1: SDHCI detect irq 0 irq 2 INTERNAL DMA
[    1.975389] Registered led device: status_blue_a
[    1.975565] Registered led device: status_blue_b
[    1.975737] Registered led device: status_green
[    1.975909] Registered led device: status_red
[    1.977248] Cirrus Logic CS4350 ALSA SoC DAC Driver
[    2.013004] cs4350_spi spi1.2: found a CS4350 at REV C2
[    2.028561] No device for DAI imx-ssi-1-0
[    2.032611] No device for DAI imx-ssi-1-1
[    2.036660] No device for DAI imx-ssi-2-0
[    2.040675] No device for DAI imx-ssi-2-1
[    2.044735] No device for DAI imx-ssi-3-0
[    2.048751] No device for DAI imx-ssi-3-1
[    2.053946] in imx_sovi_asoc_init
[    2.057321] in imx_sovi_cs4350_probe
[    2.072494] capture=0 ext_ram=0 UseIram=0
[    2.077896] DMA Sound Buffers Allocated:UseIram=0 buf->addr=9f300000 buf->area=f9e0a000 size=524288
[    2.086991] asoc: cs4350 <-> imx-ssi-2-0 mapping ok
[    2.091916] Failed to add route AOUT1L->Line Out Jack
[    2.101133] ALSA device list:
[    2.104163]   #0: imx-sovi (CS4350)
[    2.108207] TCP cubic registered
[    2.111463] NET: Registered protocol family 17
[    2.116030] VFP support v0.3: implementor 41 architecture 3 part 30 variant c rev 2
[    2.157905] regulator_init_complete: disabling VCAM
[    2.163022] regulator_init_complete: disabling VAUDIO
[    2.169251] regulator_init_complete: disabling VSD
[    2.174254] regulator_init_complete: disabling VDIG
[    2.179556] pmic_rtc mc13892_rtc.1: setting system clock to 2013-12-30 18:50:38 UTC (1388429438)
[    2.188605] Waiting for root device /dev/mmcblk0p2…
[    2.291639] mmc0: new high speed SDHC card at address aaaa
[    2.297558] mmcblk0: mmc0:aaaa SU04G 3.69 GiB
[    2.302174]  mmcblk0: p1 p2 p3
[    2.427492] mmc1: new SDIO card at address 0001
[    2.437448] EXT4-fs (mmcblk0p2): mounted filesystem with ordered data mode. Opts: (null)
[    2.445667] VFS: Mounted root (ext4 filesystem) readonly on device 179:2.
[    2.452531] Freeing init memory: 112K
[    2.572303] USB Host suspend begins
[    2.572327] will suspend roothub and its children
[    2.572361] ehci_fsl_bus_suspend, DR
[    2.572777] host suspend ends
[    2.868618] EXT4-fs (mmcblk0p3): warning: maximal mount count reached, running e2fsck is recommended
[    2.880309] EXT4-fs (mmcblk0p3): recovery complete
[    2.886462] EXT4-fs (mmcblk0p3): mounted filesystem with ordered data mode. Opts: commit=30
[    4.542400] ehci_fsl_bus_suspend, Host 1
[    6.560837] mxc_spdif mxc_spdif.0: MXC SPDIF Audio Transmitter
[    6.569232] No device for codec mxc spdif
[    6.573331] No device for DAI mxc spdif
[    6.584224] No device for DAI imx-spdif-dai
[    6.600331] capture=0 ext_ram=0 UseIram=0
[    6.617000] DMA Sound Buffers Allocated:UseIram=0 buf->addr=9f500000 buf->area=f9e8f000 size=524288
[    6.626175] asoc: mxc spdif <-> imx-spdif-dai mapping ok
[    6.770533] eth0: Freescale FEC PHY driver [Generic PHY] (mii_bus:phy_addr=0:00, irq=-1)
[    6.961939] Compat-drivers backport release: compat-drivers-v3.8-1
[/code]

So it is a NAD SOVI board using an i.mx51 freescale arm processor. With 256MB memory. The sound are produced by an Cirrus Logic CS4350 chip. The system runs a 2.6.35 kernel off a NAND flash chip in a very trimmed down setup based around busybox and the selected custom applications needed to make a media player. The system utilizes the very well known and awsome u-boot boot loader.

Without voiding guarantee by opening up the box, I can not get more specific information than that.

What amazes me the most about this setup, is that the system outputs very good sound quality, is very very stable, has fast boot times and yet does not consume very much memory. This is a lean, mean, music machine. It has one purpose in life and are trimmed down to fulfill that purpose and only that purpose.

That being said, I can see that the platform is built to support more extensive media streamers. Mine is just the low cost one. I also speculate that the NAD SOVI board has GPIO pins needed to fit into products with way more features.

Gaining access to the OS will allow me to tweak the setup a bit more to my need being both a programmer and a Linux sysadm. I have no desire to alter the OS and/or hardware, but I can envision the need for using the USB port to control an amplifier or integrate the NODE with other equipment over IP. Small tweaks. But again. Out of the box this is a wonderful product that I will recommend to friends and family.


End user review of Bluesound Node

Tuesday, December 17th, 2013

My wife and I have for years listened to music from CDs on our DALI 400 loudspeakers through an NAD 3020i amplifier and our NAD T514 DVD player.

This setup has served us well. CD’s are however an outdated technology and we found

  • that we stashed most of our CDs away. They might have looked cool on the wall in the 90′, but in 2013, in Denmark, they should be out of sight
  • that due to the point above, we only listened to a selected few
  • that many of our CDs was started to wear out
  • that our T514, which have served us well, was started to show the first sign of old age

So what to do? We looked for a way to be able to enjoy CD quality without hazzle, while taking the leap into streaming music.

We took a look at Sonos, but rejected it due to their sound quality. We considered an all streaming solution (skipping our CDs for good), but also rejected that, due to posession of a lot of non-mainstream CDs.

After investigating the market in 2013, we decided to try out a product from a canadian firm called bluesound. Bluesound and NAD electronics are owned by the same holding company, Lenbrook Industries, so many of the engineers producing NAD equipment are also involved in producing Bluesound equipment. That bodes well for the quality of Bluesound. And then bluesound have recieved good reviews audiowise from a couple of sites around the world. Given that the equipment is fairly fresh of the assembly line that is also a plus.

Bluesound produces a couple of variants of their streaming media players. We already have an amplifier, so we passed on the powernode. The vault seems cool, but a bit pricy. So due to the fact that I, as a nerd, already have a server running 24×7, we choose the cheap(ish) Bluesound Node.

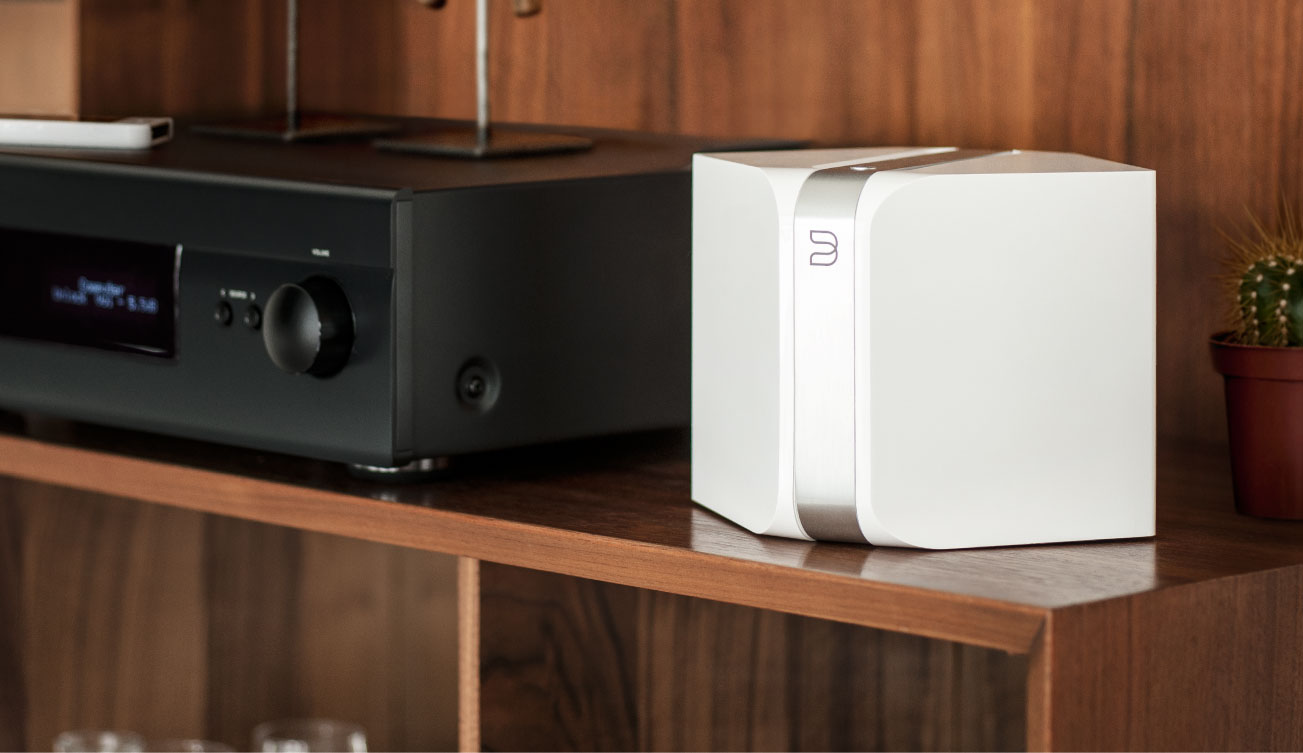
Bluesound Node

We bought the node through the danish reseller hifiklubben.dk. It arrived in a couple of days. The package contains the node itself, a quickstart manual, and cables needed for connecting the node to power, network and amplifier.

The node does not have a remote, but relies on the user having a smartphone (android or ios), which will be used for controlling the node through the Bluesound App.

The initial setup was a breeze. When first powered on, it comes up in AP/hotspot mode. You connect your smartphone to the AP, and start the Bluesound App. A wizard will guide you through the setup, which takes 1-3 minutes. After that, the node reboots and is ready for use. I setup a CIFS share.

I then ripped all our CDs using fre:ac. It went fairly quickly. A couple of notes:

  • The more CD drives, the more you can process at a time
  • Use CDDB
  • Rip to FLAC, it will save cpu cycles and you basically rip as fast as the CD drive will allow you to. Some of our CDs took around 60 seconds to rip to FLAC!
  • Each time you rip a CD, browse for the cover art meanwhile and store the coverart inside the folder with the music and name the cover art folder.jpg

After 5-10 cds it was apparent to us, that the Bluesound Node produces sound of the same or better quality than our CD player. So bluesound node is without a good streaming player. Factoring in how little money you have to pay for it, it is a really good bargin. It has just worked since day one and we have been listening to a lot more music than we did just 14 days ago!

The app on the smartphone works well. It has some minor issues, but the real beef with the app is the fact that we lack some features. Those will hopefully be added later.

So all in all 9 out of 10 stars from an enduser of bluesound node. It is highly recommended for replacement of CDs.

Version 2 of small perl mechanize script to send sms from danish telco provider Bibob

Thursday, July 26th, 2012

A year ago I wrote a small perl Mechanize script to send sms from the command line (very useful for scripts) utilizing the web-sms service you get as a Bibob customer.

Now a year later I actually found some use for it, but it didn’t work anymore due to the fact that Bibob had changed their website since then. And not just the graphics and layout, but the whole shebang.

I have made some very small changes to the perl script to make it work again and I appriciate the versatility of perl and that the Bibob webmasters obviously thought a great deal about the upgrade.

The new code can be downloaded here, hbut is also included verbatim in this post

#!/usr/bin/perl -w

##############################################################################
#
# File:         bibob_sms.pl
# Type:         bot
# Description:  Send an SMS using bibob websms and perl mechanize
# Language:     Perl
# Version:      2.0
# License:      BeerWare – Thomas S. Iversen wrote this file. As long as you
#               retain this notice you can do whatever you want with this
#               stuff. If we meet some day, and you think this stuff is worth
#               it, you can buy me a beer in return. Thomas
# History:
#               2.0 – 2011.07.26 – New version due to total bibob.dk relayout
#               1.0 – 2011.07.28 – Intial version
#
# (C) 2011,2012 Thomas S. Iversen (zensonic@zensonic.dk)
#
##############################################################################

use strict;
use WWW::Mechanize;
use File::Basename;

# Variables controlling bot behaviour

my $sms_url=‘https://www.bibob.dk/min-konto/web-sms’;
my $login_url=‘https://www.bibob.dk/’;

my $script=basename($0);
die "$script <bibob mobile number> <bibob password> <recipeient number> <message>" if(!($#ARGV+1 == 4));

my $username=$ARGV[0];
my $password=$ARGV[1];
my $recipients=$ARGV[2];
my $message=$ARGV[3];

#
# You should not need to alter anything below this line
#

#
# Main code.
#

# Create mechanize instance
my $mech = WWW::Mechanize->new( autocheck => 1 ); #Create new browser object
$mech->agent_alias( ‘Windows IE 6′ ); #Create fake headers just in case
$mech->add_header( ‘Accept’ => ‘text/xml,application/xml,application/xhtml\+xml,text/html,text/plain,image/png’ );
$mech->add_header( ‘Accept-Language’ => ‘en-us,en’ );
$mech->add_header( ‘Accept-Charset’ => ‘ISO-8859-1,utf-8′ );
$mech->add_header( ‘Accept-Language’ => ‘en-us,en’ );
$mech->add_header( ‘Keep-Alive’ => ’300′ );
$mech->add_header( ‘Connection’ => ‘keep-alive’ );

# Get login page
$mech->get($login_url);
$mech->success or die "Can’t get the login page";

# Submit the login form with username (mobilnumber) and password
$mech->submit_form(with_fields => { ‘phoneNumber’ => $username, ‘password’ => $password });
$mech->success or die "Could not login";

# Get sms page
$mech->get($sms_url);
$mech->success or die "Could not get sms page";

# Send sms by submitting sms form
$mech->submit_form(with_fields => { ‘recipients’ => $recipients, ‘message’ => $message });
$mech->success or die "Could not send sms";

# Figure out status
my $html = $mech->content();
die "Form submitted, but message does not appear to be sent" if(!$html=~/Beskeden blev afsendt/ig);
exit 0;

A trip to Häckeberga Castle in Sweden

Sunday, May 6th, 2012

Just returned from a trip to Häckeberga Castle in Sweden with my wife I just have to write that this is one of the best weekends in a long time. The castle is beautifully located on one of the 7 islands in the Häckebergalake.The castle nicely presents itself

Häckebergas castle

What sets the experience apart from your normal swedish castle is these things:

  • The nature surrounding the castle is simply astonishing. Almost no man made sound can be heard and it is very easy to take a tour into one of the forrests around the castle without hearing or meeting anybody but yourself and your spouse.
  • The food served at the castle is of gourmet class. It is not your average continental steak or ala carte menu. You get a 4-dish gourmet menu with 2-3 appetizers in between. It is complemented with a 4 glass wine menu that enhances the experience believe it or not.
  • The staff is professional yet very relaxed and friendly
  • There is only room for very few guests due to the limited amount of rooms, so it never gets crowded (the downside being that you have to book months in advance ;-)

I had a splendid weekend there. Real quality time with my beautiful wife. Will not be the last time we visit that place!

Small perl mechanize script to send sms from danish telco provider Bibob

Thursday, July 28th, 2011

It can be handy to send sms’es from scripts. In old time you could do that in Telia by sending a mail to <mobile number>@gsm1800.telia.dk. But that service was closed. Now that I am leaving Telia in favor of Bibob I saw that they had a websms service.

And so I combined their fine web service with my perl scripting skillz. The script can be downloaded here

Do not forget the agreement between you and bibob. You are only allowed to use the websms service (and thus this script) for personal use. I am not to blame if bibob closes your bibob account because you spam-smsed a lot of people.

The code is also included here:


#!/usr/bin/perl -w

#####################################################################
#
# File:         bibob_sms.pl
# Type:         bot
# Description:  Send an SMS using bibob websms and perl mechanize
# Language:     Perl
# Version:      1.0
# License:      BeerWare – Thomas S. Iversen wrote this file.
#               As long as you retain this notice you can
#               do whatever you want with this stuff.
#               If we meet some day, and you think this stuff is
#               worth it, you can buy me a beer in return. Thomas
#
# History:
#               1.0 – 2011.07.28 – Intial version
#
# (C) 2011 Thomas S. Iversen (zensonic@zensonic.dk)
#
#####################################################################

use strict;
use WWW::Mechanize;
use File::Basename;

# Variables controlling bot behaviour

my $sms_url=‘https://www.bibob.dk/bibob/bibob?cmd=websmssender’;
my $login_url=‘https://www.bibob.dk/bibob/bibob?cmd=loginFrame’;

my $script=basename($0);
die "$script <bibob mobile number> <bibob password> <recipeient number> <message>" if(!($#ARGV+1 == 4));

my $username=$ARGV[0];
my $password=$ARGV[1];
my $recipients=$ARGV[2];
my $message=$ARGV[3];

#
# You should not need to alter anything below this line
#

#
# Main code.
#

# Create mechanize instance
my $mech = WWW::Mechanize->new( autocheck => 1 ); #Create new browser object
$mech->agent_alias( ‘Windows IE 6′ ); #Create fake headers just in case
$mech->add_header( ‘Accept’ => ‘text/xml,application/xml,application/xhtml\+xml,text/html,text/plain,image/png’ );
$mech->add_header( ‘Accept-Language’ => ‘en-us,en’ );
$mech->add_header( ‘Accept-Charset’ => ‘ISO-8859-1,utf-8′ );
$mech->add_header( ‘Accept-Language’ => ‘en-us,en’ );
$mech->add_header( ‘Keep-Alive’ => ’300′ );
$mech->add_header( ‘Connection’ => ‘keep-alive’ );

# Get login page
$mech->get($login_url);
$mech->success or die "Can’t get the login page";

# Submit the login form with username (mobilnumber) and password
$mech->submit_form(with_fields => { ‘loginmsisdn’ => $username, ‘login-password’ => $password });
$mech->success or die "Could not login";

# Get sms page
$mech->get($sms_url);
$mech->success or die "Could not get sms page";

# Send sms by submitting sms form
$mech->submit_form(with_fields => { ‘recipients’ => $recipients, ‘message’ => $message });
$mech->success or die "Could not send sms";

# Figure out status
my $html = $mech->content();
die "Form submitted, but message does not appear to be sent" if(!$html=~/Beskeden blev afsendt/ig);

exit 0;

Replacing a fuse on an Vaillant Ecotec gasburner

Monday, July 4th, 2011


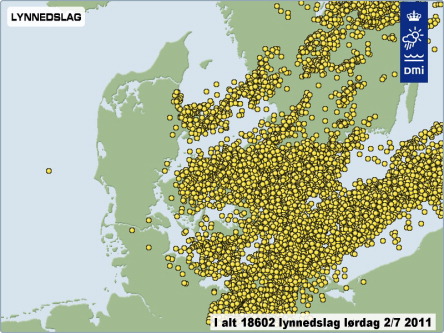
Last night a big thunderstorm hit my home.

Ligtning hitting Sealand Denmark

During the storm a lightning actually hit the house/so close to the house that it went into the electrical system. Luckily the legislation about electricity in danish households requires that electricians installs HPFI and thermo fuses, so after the a white spark out of a wall plug, the HPFI and thermo fuses kicked in and took down the whole system.

…. or so I thought. The lightning had actually been fast enough to hit the control unit of my Gas Boiler – It would not turn on this morning to heat water for the day.

This post will show how to open a vaillant ecotec gasboiler and exchange the fuse(s).

<DISCLAIMER>

Turn off your boiler before doing anything. Disconnect it from the wall plug. Use original fuses. If in doubt – STOP! Do not tamper with the Gas part of the heater! If the fuse blows again, do NOT substitute with something that can not blow! Do call an qualified repair man if that happens!

And finally: if you blow up yourself and/or your house/friends/families/dogs/whatever I can not be held responsible! Do not trust a stranger on the internet just because you are trying to save a few bucks!

Safety before anything else!

</DISCLAIMER>


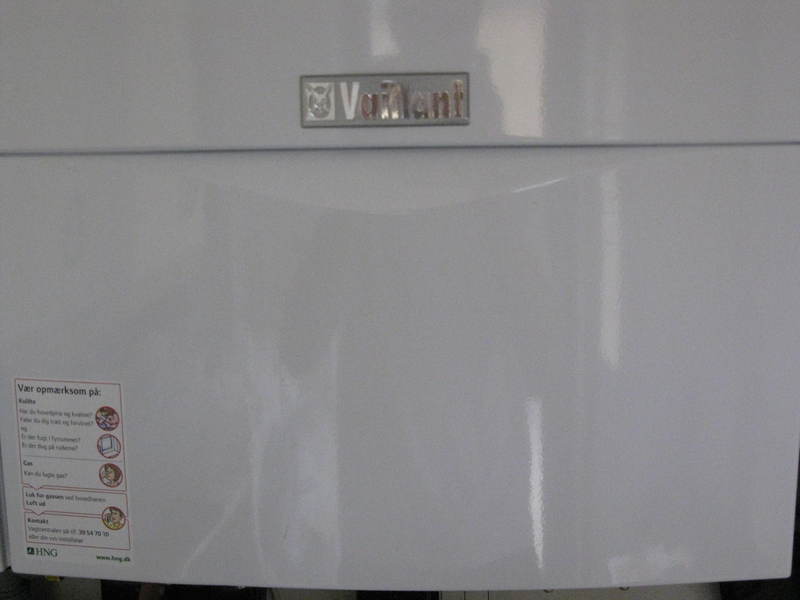
With the disclaimer out of the way, lets get going. First locate the front of your boiler. It will look like this.


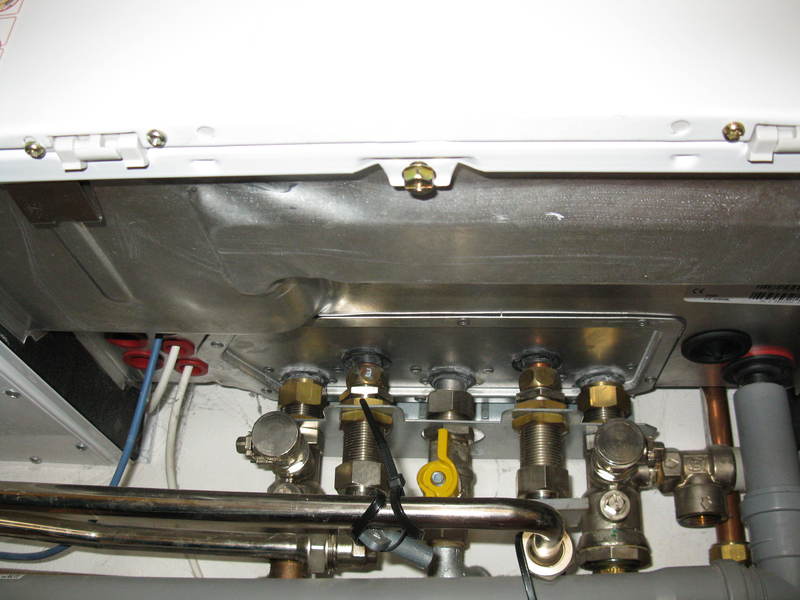
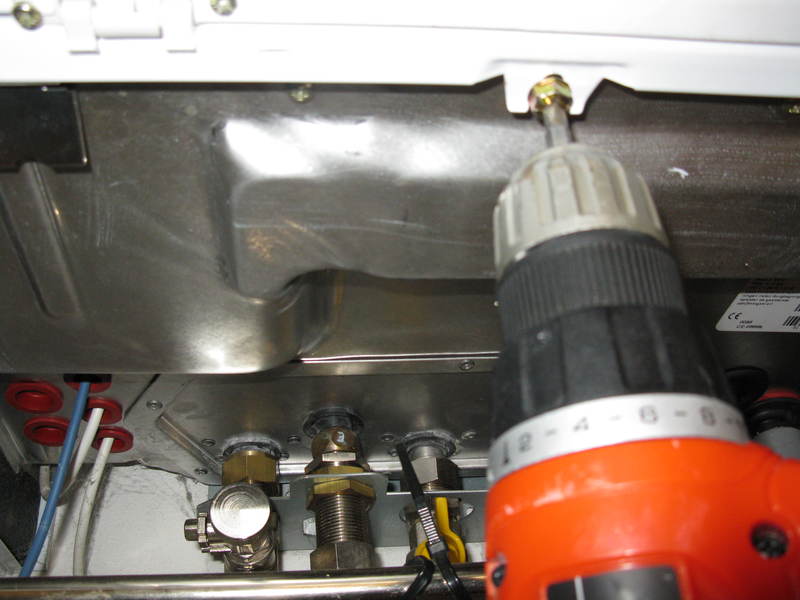
The front of the boiler is held in place by one screw on the bottom:


Remove the screw with a screwdriver


Remove the front by pulling outwards after you have ‘unclipped’ it (there are two clips to secure it besides the screw)


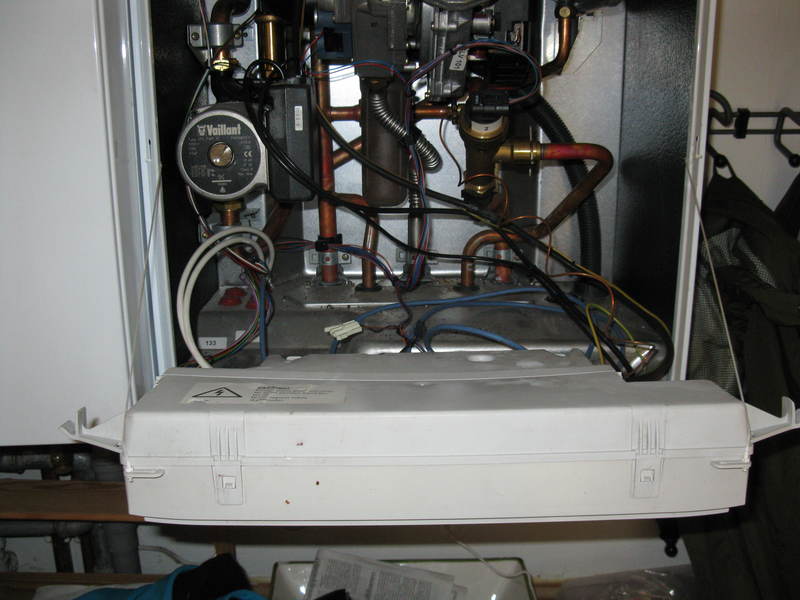
You should now be able to look inside the boiler. If you are unsecure, stop. Remember the disclaimer!


Grab the to white, apply pressure and pull down the control unit like this:


Now we are going to open up the control unit.


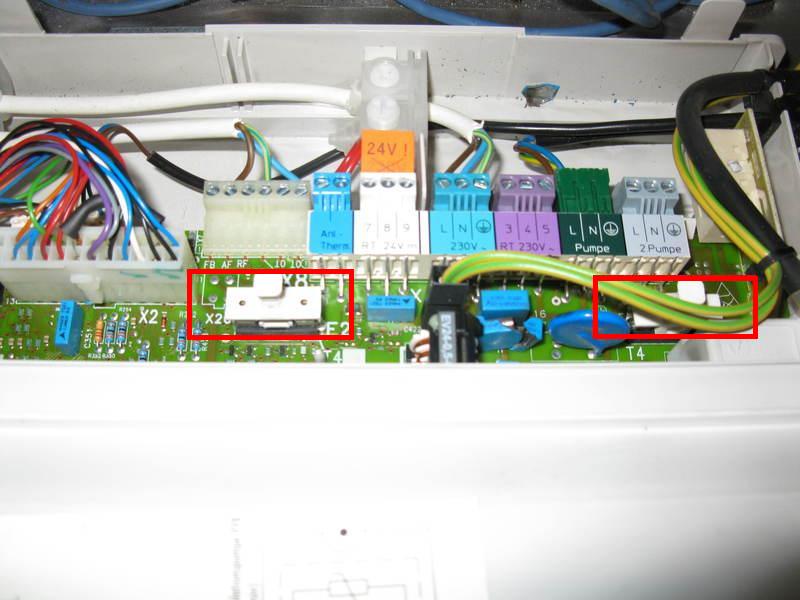
Locate the fuses:


Exchange the fuses. On the vaillant you have two spare fuses on the inside of the control unit:

Assemble the whole lot back and turn on the boiler again. Hopefully it will come back to life. If it doesn’t something is seriously wrong – call an vaillant approved repair man.

And …. do not forget to order a new fuse right away!

About growing logical volumes, md devices, partitions and filesystems in Ubuntu 10.10

Monday, November 15th, 2010

Recently I found myself in a situation, where I was running out of space in my server. Luckily for me, the disks was not 100% utilized. On the positive side, that meant, that I had the possibility to extend my system without buying new hardware. On the negative side it meant that I had to fool around with my precious data. Normally I do this for a living, but on my job it is just customer data. In this case we are talking about pictures of the kids and wife….. Much more important stuff for sure :-)

So my setup

  • / mounted as an ext3 fs on top of an logical volume (LVM2) called lvroot in vg000
  • /boot mount as an ext3 fs directly on /dev/md0
  • vg00 has one physical volume called /dev/md1
  • /dev/md0 is a RAID1 device on /dev/sda1 and /dev/sdb1
  • /dev/md1 is a RAID1 device on /dev/sda2 and /dev/sdb2

Here is the business case: both /dev/sda2 and /dev/sdb2 was not fully utilized. /dev/sdb2 had 67GB unused and /dev/sda2 had around 250GB unused. That meant that I could resize / with 67GB up front, for free!

I startet out with this situation

root@edison:~# df -k /
Filesystem             1K-blocks      Used Available Use% Mounted on
/dev/mapper/vg000-root 240149008 232617156   2652288  99% /

So how do you do this, in an easy, controlled way, without taking time consuming backups of hundres of GB (I do make backups, so it is very easy for me to write this ;-) )? You can do it like I did below.

<DISCLAIMER>This is best-effort, free of charge information.  If you end up breaking your system into several pieces, it is your responsibility. I can and will not be held liable. You get to keep the pieces yourself! That will hopefully teach you not to trust ‘expert advice’ from some random internet place run by a random danish guy.</DISCLAIMER>

That said. Lets do some storage work

# First I fail /dev/sdb2
mdadm --fail /dev/md1 /dev/sdb2

# Then I remove /dev/sdb2 from the running config
mdadm --remove /dev/md1 /dev/sdb2
# Then we delete and recreate /dev/sdb2 with a larger size.
# Do a print beforehand to see the "before" values
fdisk /dev/sdb
Command (m for help): p

Disk /dev/sdb: 320.1 GB, 320072933376 bytes
255 heads, 63 sectors/track, 38913 cylinders
Units = cylinders of 16065 * 512 = 8225280 bytes
Sector size (logical/physical): 512 bytes / 512 bytes
I/O size (minimum/optimal): 512 bytes / 512 bytes
Disk identifier: 0xa286eb78

Device Boot      Start         End      Blocks   Id  System
/dev/sdb1   *           1          26      208813+  fd  Linux raid autodetect
/dev/sdb2              27       30400   243979155   fd  Linux raid autodetect
# delete it
Command (m for help): d
Partition number (1-4): 2
# recreate with larger size and same type
Command (m for help): n
Command action
 e   extended
 p   primary partition (1-4)
p
Partition number (1-4): 2
First cylinder (27-38913, default 27):
Using default value 27
Last cylinder, +cylinders or +size{K,M,G} (27-38913, default 38913):
Using default value 38913
Command (m for help): t
Partition number (1-4): 2
Hex code (type L to list codes): fd
Changed system type of partition 2 to fd (Linux raid autodetect)
# Write it
Command (m for help): w

If you are so lucky that you are not using the device for anything else (ie booting), the kernel can reread the modified partition table on the live system. If the system do use the device for something, you have to reboot the system. Which I had to do. Which I then did… By issuing the command:

reboot

When the server came back up, I assembled the /dev/md1 device again and waited for a resync. I speeded up the resync quite significantly by issuing the echo commands, which basically just tell md that it has to work as hard as it possibly can.

# Assemble again
mdadm --add /dev/md1 /dev/sdb2
# Speed up rebuild process
 echo 900000 > /proc/sys/dev/raid/speed_limit_min
 echo 900000 > /proc/sys/dev/raid/speed_limit_max
# watch status, eat pizze, drink a beer
watch cat /proc/mdstat

When the resync was done, I did it all over, replacing /dev/sdb2 with /dev/sda2.  After that,  I had grown the underlying partitions on my two drives, but both md and lvm had not noticed anything.

I made sure everything worked fine  and went onto the  next step – growing an md device on the fly.

# See current md device stats
root@edison:~# mdadm -D /dev/md1
/dev/md1:
 Version : 00.90
 Creation Time : Sat Jul 31 16:45:08 2010
 Raid Level : raid1
 Array Size : 243979072 (232.68 GiB 249.83 GB)
 Used Dev Size : 243979072 (232.68 GiB 249.83 GB)
 Raid Devices : 2
 Total Devices : 2
Preferred Minor : 1
 Persistence : Superblock is persistent

 Update Time : Mon Nov 15 20:16:27 2010
 State : clean
 Active Devices : 2
Working Devices : 2
 Failed Devices : 0
 Spare Devices : 0

 UUID : f510bad0:59d990c1:19dfcc76:62eb3300
 Events : 0.204498

 Number   Major   Minor   RaidDevice State
 0       8        2        0      active sync   /dev/sda2
 1       8       18        1      active sync   /dev/sdb2

# Grow the device to the max - took about 1-2 seconds, but see below
root@edison:~#  mdadm --grow --size=max /dev/md1
# Recheck the device stat.
root@edison:~# mdadm -D /dev/md1
/dev/md1:
 Version : 00.90
 Creation Time : Sat Jul 31 16:45:08 2010
 Raid Level : raid1
 Array Size : 312359744 (297.89 GiB 319.86 GB)
 Used Dev Size : 312359744 (297.89 GiB 319.86 GB)
 Raid Devices : 2
 Total Devices : 2
Preferred Minor : 1
 Persistence : Superblock is persistent

 Update Time : Mon Nov 15 20:17:21 2010
 State : active, resyncing
 Active Devices : 2
Working Devices : 2
 Failed Devices : 0
 Spare Devices : 0

 Rebuild Status : 78% complete

 UUID : f510bad0:59d990c1:19dfcc76:62eb3300
 Events : 0.204503

 Number   Major   Minor   RaidDevice State
 0       8        2        0      active sync   /dev/sda2
 1       8       18        1      active sync   /dev/sdb2

Notice how the drive went into sync state. Looking at mdstat confirms that. You can use the device before the mirroring is done. … or you can play it safe and wait. I decided to go ahead and use it before the sync was done. Living on the edge … this is not work. Only something your wife will never forgive you for ;-)

root@edison:~# cat /proc/mdstat
Personalities : [linear] [multipath] [raid0] [raid1]
[raid6] [raid5] [raid4] [raid10]

md1 : active raid1 sda2[0] sdb2[1]
 312359744 blocks [2/2] [UU]
 [===============>.....]  resync = 78.6% (245745600/312359744)
finish=21.2min speed=52265K/sec

md0 : active raid1 sdb1[1] sda1[0]
 208704 blocks [2/2] [UU]
unused devices: <none>

Next step. Making lvm aware of the change. Quite easy actually:

# Before
root@edison:~# pvdisplay /dev/md
 --- Physical volume ---
 PV Name               /dev/md1
 VG Name               vg000
 PV Size               232,68 GiB / not usable 832,00 KiB
 Allocatable           yes (but full)
 PE Size               4,00 MiB
 Total PE              59565
 Free PE               0
 Allocated PE          59565
 PV UUID               saiFOT-Dw2O-OnVv-rA4b-wZG3-OQHN-fFD1w

You then issue an pvresize on the pv  like this

root@edison:~# pvresize /dev/md1
 Physical volume "/dev/md1" changed
 1 physical volume(s) resized / 0 physical volume(s) not resized

And you end up with

root@edison:~# pvdisplay /dev/md1
 --- Physical volume ---
 PV Name               /dev/md1
 VG Name               vg000
 PV Size               297,89 GiB / not usable 2,62 MiB
 Allocatable           yes
 PE Size               4,00 MiB
 Total PE              76259
 Free PE               16694
 Allocated PE          59565
 PV UUID               saiFOT-Dw2O-OnVv-rA4b-wZG3-OQHN-fFD1wI

We are getting there? Now onto extending the volume. First peek at the current sizes/free space

root@edison:~# vgdisplay vg000
 --- Volume group ---
 VG Name               vg000
 System ID
 Format                lvm2
 Metadata Areas        1
 Metadata Sequence No  4
 VG Access             read/write
 VG Status             resizable
 MAX LV                0
 Cur LV                1
 Open LV               1
 Max PV                0
 Cur PV                1
 Act PV                1
 VG Size               297,89 GiB
 PE Size               4,00 MiB
 Total PE              76259
 Alloc PE / Size       59565 / 232,68 GiB
 Free  PE / Size       16694 / 65,21 GiB
 VG UUID               rL7lfw-H2FC-4ala-KVV3-bLIA-MbA9-co2n1O
root@edison:~# lvdisplay /dev/vg000/root
 --- Logical volume ---
 LV Name                /dev/vg000/root
 VG Name                vg000
 LV UUID                uDPn6b-AvyO-xH2n-zpXm-n0Xt-5g5n-aSdu4C
 LV Write Access        read/write
 LV Status              available
 # open                 1
 LV Size                232,68 GiB
 Current LE             59565
 Segments               1
 Allocation             inherit
 Read ahead sectors     auto
 - currently set to     256
 Block device           251:0

Then extend the volume

root@edison:~# lvextend -l 76259 /dev/vg000/root
Extending logical volume root to 297,89 GiB
Logical volume root successfully resized

One step left – resize the live filesystem

root@edison:~# resize2fs /dev/vg000/root
resize2fs 1.41.12 (17-May-2010)
Filesystem at /dev/vg000/root is mounted on /; on-line resizing required
old desc_blocks = 15, new_desc_blocks = 19
Performing an on-line resize of /dev/vg000/root to 78089216 (4k) blocks.
The filesystem on /dev/vg000/root is now 78089216 blocks long.

How much did I gain:

root@edison:~# df -k /
Filesystem              1K-blocks      Used Available Use% Mounted on
/dev/mapper/vg000-root  307454080 232621080  68588172  78% /

Almost a walk in the park. I did actully run into a problem during this procedure. When I removed /dev/sdb2, grub would not reboot. Instead it gave me a grub rescue prompt.  I overcame this booting a rescue CD, starting up the system using that. I then added /dev/sdb2 into /dev/md1 from the rescue cd, waited for the mirroring and and rebooted again. When I did the same for /dev/sda2, grub was happy all along?! I have not bothered to figure out why grub misbehaved, I just put grub down as being like a teenager: unreliable and causing problems for no obvious reason ;-)

Ubuntu Headless installation (serialport)

Sunday, August 1st, 2010

I had to install ubuntu 10.04 server edition over the serialport. This is doable, but requires a keyboard to be attached and keys pressed blindly in the right sequence. Here is a little cookbook on what to press:

  1. Run a terminal client on the serial console device. Configure the serial port to either the failsafe 9600 n-8-1, Hardware Flow Control=NONE, or to the much speedier 115200 n-8-1, Hardware Flow Control=NONE. The latter should be used only if the serial port in both ends support this kind of speed.
  2. Boot the server with the ubuntu 10.04 server install media in the CD/DVD drive, or from a USB ke
  3. When it has booted into the installation menu (takes a couple of seconds), then do this
    • Press ‘Enter’ (for language selection)
    • Press ‘F6′ (Other Options)
    • Press ‘ESC’ (to close the Other Options Menu)
    • Press ‘Backspace’ 3 Times (to delete “– “)
    • Type ‘console=ttyS0,115200n8 — ‘
    • Press ‘Enter’
  4. Installation willl continue, ouputting the dialogs on the serial device.

You should ofcourse replace ttyS0 with another serial device, if applicable. I am at a loss as to why I have to do this in order for me to install Ubuntu Server 10.04 over the serial port in 2010!

How to use a broken IBM Thinkpad T43 for something useful using puppy linux.

Wednesday, July 21st, 2010

I recently got my hands on a IBM Thinkpad T43. Unfortunately it was broken. More specifically the connector between the mainboard and the harddrive had problems.

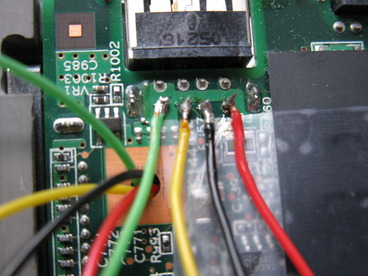
IBM T43 connector (broken)

I googled a bit and discovered, that this was a known problem. The laptop worked fine, if I put pressure on the right spot on the case of the Thinkpad. Otherwise it would not detect and/or spin up the harddrive. I tried to fix it by re-soldering the connector and using some two-component glue to fixate the connector. I did not succeed :-/

So then what? Throw out the laptop? Or? … I decided to make a project out of it.

A laptop without storage is useless. Due to the broken connector, I could not use a harddrive. I did not want to use a cdrom as it is a slow medium. That left me with a USB flash drive as the only option. It would be a clumsy solution just to plug a USB flash drive into the laptop and be done with it, so I chose to solder a USB flash directly onto the mainboard.

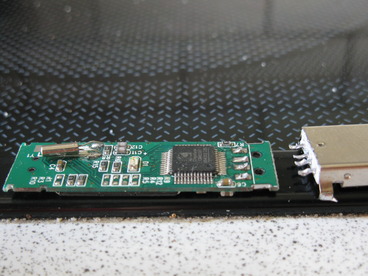
First I stripped a standard 1GB USB Flash from its case and detached the PCB from the USB connector using a soldering iron

Stripped USB flash

After that I soldered 5 wires onto the PCB of the laptop and used one of the holes in the PCB used for assembly as a pass through hole. I initially used 4 wires as the USB connector only had 4 pins, but that was not enough. More on that later.

Wires soldered onto mainboard

Having soldered the wires onto to the mainboard, I now needed to solder the other ends onto to the PCB of the USB flash. That went fairly smoothly

Wires soldered onto flash

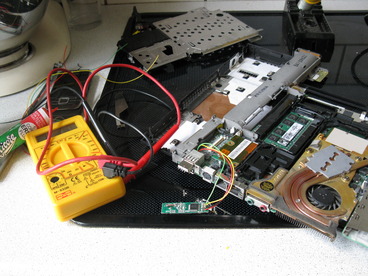
Before powering on anything, I used a multimeter to check for bad solderjoins and shorts. I found neither.

Checking for shorts using digital multimeter

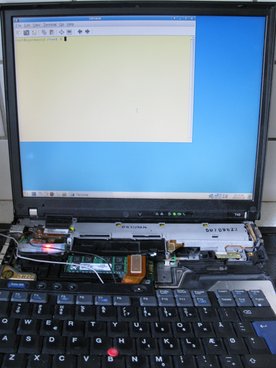
Luckily I had a Linux based rescue distribution installed on the USB flash drive, so I just booted that to see if the operation on the T43 was a success. As can be seen below it worked just fine. Well, sort of fine, but more on that in a moment.

Testbooting the flashdrive

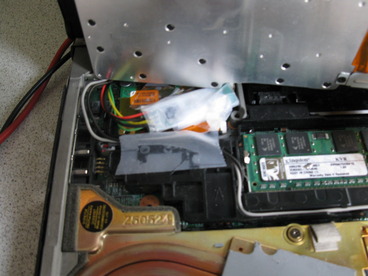
Almost done now. I just needed to assemble the laptop again, leaving the USB Flash inside.

Ready to wrap up

Closing the lid on the laptop, securing all the screws I had myself a working IBM Thinkpad T43. Or so I thought. When I tested the laptop thoroughly I discovered that the kernel ring buffer was filled with

hub 2-0:1.0: over-current change on port 1
hub 2-0:1.0: over-current change on port 2

That cryptic message just states that the USB device is drawing more power than it is allowed to by the USB specification. Or more precisely that the port on the USB hub inside the laptop is delivering more power than it was supposed to. It first that puzzled me. Then I read about the USB connector and realized my fail. The 4 wires of the USB connector consists of  VCC, GND, Data+ and Data –. Given both VCC and GND was part of the 4 pins I only soldered 4 pins. After seeing the problems above, I investigated the matter and found a reference to OverCurrent (OC) protection on the header itself. I thus soldered the 5th pin and the problem went away.

I now had a working IBM Thinkpad T43 with 1GB of flash storage. What should I use it for? I decided to use it for puppy linux. Primarily for two reasons.

  1. It appeared to be tailor made for small harddrives
  2. I had never tried it before

I downloaded the 106MB large iso file and burned it onto a CDrom. Now I faced the problem of installing puppy linux onto my flash without using a cdrom drive (as I found the laptop without one). Puppy linux made it quite easy. Using another computer I booted the cdrom. Installed puppy onto a spare flash drive. Booted that flash drive in my IBM Thinkpad T43 and pressed “install” once more, installing it onto the “internal” flash drive.

Booted into puppy linux

All done. Actually it takes quite some time to boot the machine, but that is primarily due to the bios insisting on searching for a harddrive. Unfortunately the IBM BIOS lacks the option to stop it from doing that. After the system is loaded however, it is lightning fast. Way faster than my IBM Thinkpad T400. This is due to the fact that puppy linux loads everything into a ramdisk, so starting program does not require any moving parts to be ready. Programs starts instantaneously. The whole experience just proves (once more), that the computers of today is severely I/O limited, but hopefully SSD will change that real soon now(tm)