Archive for the ‘unix’ Category

Using an Linksys E3000 AP as a general linux server

Wednesday, September 21st, 2011

Recently I said farwell and thanks for all the fish to my old Linksys WRT54G router(s). They served me well for many years, but end the end they lacked IEEE 802.11n and 1000BASE-T. After looking around I decided to buy the Linksys E3000 AP. It stayed within my budget, had almost all features I desired and could also run community based firmware.

I tried to run with the built in firmware. And I did. For a month or so. And then I gave in and installed dd-wrt on the thing. The built-in firmware works and is stable. But boy it lacks features!

Getting dd-wrt onto my AP was easy due to this tutorial. After I got dd-wrt onto the AP I had myself a full blown linux distribution. Comparing the E3000 with its 240MHz MIPS cpu and 64MB memory to my first PC with its 66MHz intel 80486 with 4MB memory made me smile ;-)

root@dd-wrt:~# cat /proc/cpuinfo
system type             : Broadcom BCM4716 chip rev 1
processor               : 0
cpu model               : MIPS 74K V4.0
BogoMIPS                : 239.20
wait instruction        : no
microsecond timers      : yes
tlb_entries             : 64
extra interrupt vector  : no
hardware watchpoint     : yes
ASEs implemented        : mips16 dsp
shadow register sets    : 1
VCED exceptions         : not available
VCEI exceptions         : not available

Having such a small nifty general purpose platform at my disposal ofcourse made me think what I should use it for (besides moving bytes around in my house). I found these things I want to and/or have implemented on it:

  • Local DNS server. I have many many projects brewing all the time and have vast amount of hardware. I utilize a DNS server to keep track of my ip assignments, either static or through DHCP. Running a DNS server on the router is a must.
  • PXEBOOT server.
  • TFTP server.
  • NFS server
  • DansGuardian filter

Small perl mechanize script to send sms from danish telco provider Bibob

Thursday, July 28th, 2011

It can be handy to send sms’es from scripts. In old time you could do that in Telia by sending a mail to <mobile number>@gsm1800.telia.dk. But that service was closed. Now that I am leaving Telia in favor of Bibob I saw that they had a websms service.

And so I combined their fine web service with my perl scripting skillz. The script can be downloaded here

Do not forget the agreement between you and bibob. You are only allowed to use the websms service (and thus this script) for personal use. I am not to blame if bibob closes your bibob account because you spam-smsed a lot of people.

The code is also included here:


#!/usr/bin/perl -w

#####################################################################
#
# File:         bibob_sms.pl
# Type:         bot
# Description:  Send an SMS using bibob websms and perl mechanize
# Language:     Perl
# Version:      1.0
# License:      BeerWare – Thomas S. Iversen wrote this file.
#               As long as you retain this notice you can
#               do whatever you want with this stuff.
#               If we meet some day, and you think this stuff is
#               worth it, you can buy me a beer in return. Thomas
#
# History:
#               1.0 – 2011.07.28 – Intial version
#
# (C) 2011 Thomas S. Iversen (zensonic@zensonic.dk)
#
#####################################################################

use strict;
use WWW::Mechanize;
use File::Basename;

# Variables controlling bot behaviour

my $sms_url=‘https://www.bibob.dk/bibob/bibob?cmd=websmssender’;
my $login_url=‘https://www.bibob.dk/bibob/bibob?cmd=loginFrame’;

my $script=basename($0);
die "$script <bibob mobile number> <bibob password> <recipeient number> <message>" if(!($#ARGV+1 == 4));

my $username=$ARGV[0];
my $password=$ARGV[1];
my $recipients=$ARGV[2];
my $message=$ARGV[3];

#
# You should not need to alter anything below this line
#

#
# Main code.
#

# Create mechanize instance
my $mech = WWW::Mechanize->new( autocheck => 1 ); #Create new browser object
$mech->agent_alias( ‘Windows IE 6′ ); #Create fake headers just in case
$mech->add_header( ‘Accept’ => ‘text/xml,application/xml,application/xhtml\+xml,text/html,text/plain,image/png’ );
$mech->add_header( ‘Accept-Language’ => ‘en-us,en’ );
$mech->add_header( ‘Accept-Charset’ => ‘ISO-8859-1,utf-8′ );
$mech->add_header( ‘Accept-Language’ => ‘en-us,en’ );
$mech->add_header( ‘Keep-Alive’ => ’300′ );
$mech->add_header( ‘Connection’ => ‘keep-alive’ );

# Get login page
$mech->get($login_url);
$mech->success or die "Can’t get the login page";

# Submit the login form with username (mobilnumber) and password
$mech->submit_form(with_fields => { ‘loginmsisdn’ => $username, ‘login-password’ => $password });
$mech->success or die "Could not login";

# Get sms page
$mech->get($sms_url);
$mech->success or die "Could not get sms page";

# Send sms by submitting sms form
$mech->submit_form(with_fields => { ‘recipients’ => $recipients, ‘message’ => $message });
$mech->success or die "Could not send sms";

# Figure out status
my $html = $mech->content();
die "Form submitted, but message does not appear to be sent" if(!$html=~/Beskeden blev afsendt/ig);

exit 0;

Upgrading OBP and ALOM on a SunFire v210/v240

Sunday, July 24th, 2011

Recently I got my hands on a piece of oldish SUN equipment (SunFire V210/V240). It was in an ok condition. Not perfect, but still usable and I will be able to fix the smaller issues.

One of the issues was the really really old OBP and ALOM installed. In this post I will show how to upgrade OBP and ALOM. The key thing to remember is to

  1. Read ALL the attached readmes and whats not.
  2. Make sure ALL dependencies are met
  3. Upgrade the OBP before you upgrade the ALOM

And as usual. If you break your stuff following this post, then sorry but I can and will not be held responsible for anything you do. It worked for me. If it works for you, great. If it doesn’t, then tuff luck.

With that out of the way lets get started. First we need to obtain the ALOM and OPB patch. As a private person you might have a hard time getting hold of these files without an active support contract with oracle. I know I had. Mail  me if you run out of luck. You will need

  • 142700-02.zip – OBP 4.30.0
  • ALOM_1.6.10_fw_hw0.tar.gz – ALOM 1.6.10

Below is the raw output of the upgrade so you can see how it is done. OBP first

**** While in the OS download and unpack the OBP firmware

# wget http://someserver/142700-02.zip

# unzip 142700-02.zip

# cd 142700-02

# cp flash-update*  /

# chmod 755 /flash-update*

# halt

**** From the OBP prompt issue

ok boot disk /flash-update-SunFire240

Firmware Release(s)                Firmware Release(s)
Currently Existing in the System      Available for Installation  /  Install?
———————————- ——————————————-
OBP 4.11.4 2003/07/23 08:04        OBP 4.30.0 2010/01/06 14:48          YES
POST 4.30.4 2010/01/06 15:10         YES

Type sa if you wish to select all available firmware releases for
installation.  Type h for help, quit to exit, or cont to continue: cont

The Flash programming process is about to begin.
Type h for help, q to quit, Return or Enter to continue:

Erasing the top half of the Flash PROM.
Programming OBP into the top half of the Flash PROM.
Verifying OBP in the top half of the Flash PROM.

Erasing the top half of the Flash PROM.
Programming POST into the top half of Flash PROM.
Verifying POST in the top half of the Flash PROM.
Programming was successful.

SC Alert: Host System has Reset
SC Alert: Host System has read and cleared bootmode.

Configuring system memory & CPU(s)
Probing system devices
Probing memory
NOTICE: Initializing security keystore
Probing I/O buses

Sun Fire V210, No Keyboard
Copyright 2010 Sun Microsystems, Inc.  All rights reserved.
OpenBoot 4.30.4.a, 4096 MB memory installed, Serial #57866961.
Ethernet address 0:3:ba:72:fa:d1, Host ID: 8372fad1.

NOTICE: Updating OpenBoot NVRAM diagnostic configuration variables..
diag-script =  normal
diag-trigger =          error-reset power-on-reset
diag-level =            max
verbosity =             normal
service-mode? =         false
auto-boot-on-error? =   true
error-reset-recovery =  sync

Your OBP is now updated. Now to the ALOM. From the OS

# firmware

# /usr/platform/`uname -i`/sbin/scadm version

SC Version v1.3
SC Bootmon Version:  v1.3.0
SC Firmware Version:  v1.3.0

# /usr/platform/`uname -i`/sbin/scadm download boot alombootfw
……………….. (100%)
Download completed successfully

Please wait for verification

…………
Complete

# sleep 60
#  /usr/platform/`uname -i`/sbin/scadm version

SC Version v1.3
SC Bootmon Version:  v1.6.10
SC Firmware Version:  v1.3.0

# sleep 120
#  /usr/platform/`uname -i`/sbin/scadm version

SC Version v1.6
SC Bootmon Version:  v1.6.10
SC Firmware Version:  v1.6.10

You ALOM is now updated. Nothing fancy really.

Debugging ‘Unsupported authentication scheme ‘ntlm” errors while using Perl WWW::Mechanize

Thursday, July 21st, 2011

Recently I got a really boring task of performing the same task over and over again … in a GUI. Obviously I am waaay to lazy for that (and bright enough to figure out how big a waste of time that is).

In an instance I fired up vi and started to hack together a little perl script using WWW::Mechanize to do all the work for me. I quickly ran into problem …. I got ‘Unsupported authentication scheme ‘ntlm” errors when trying to fetch the pages.

I played around quite some time before I realized that i missed the Authen::NTLM module. I had the LWP::Authen/Ntlm and that tricked me for quite some time. I was down to a simple script that just had

#!/usr/bin/perl -w
use LWP::Authen/Ntlm;

Before I could see that I missed Authen::NTLM. Once I had that downloaded and installed, things started to work as expected.

Reducing RHEL5 idle cpu usage under esx

Tuesday, July 5th, 2011

Today I installed two RHEL5 servers on my ESXi rig. To my surprise they idled at around 300MHz?! My Debian 6.0 based server and my Win2k3 based server idles at around 50MHz, sowhat was the problem?!

Looking inside the vm showed that the vm was idle. So what was going on here? I tried to use vmxnet3 instead of E1000. I tried to stop a lot of services. To no avail.

It turns out that it is the frequency of the context switches. Edit /etc/grub.conf and add divider=10 to the ‘kernel’ line and reboot the beast. Usage will drop to sane levels!

Debugging dns problems

Thursday, February 17th, 2011

Recently I faced a DNS problem in a complex setup. I had a very locked down jumphost with one public network and two internal networks and a very nazi firewall controlling what packets went in an out.

On the inside I had a linux machine running BIND, also with a firewall and a locked down setup.

On yet another host on the inside, running HP-UX, DNS resolving worked just fine.

On the jumphost it didn’t work at all.

Took me hours to figure out what was going on. I went over the firewall again and again. On both the jumphost and the DNS server. I went over the bind configuration again and again. The network setup. To no avail. All i got was

Got recursion not available from 192.168.1.79, trying next server

In the end it turned out to be due to the fact that on the linux jump server, I had a two nameserver lines

domain zensonic.dk
search zensonic.dk
nameserver 192.168.1.79
nameserver 192.168.1.80

I hadn’t bothered to setup the DNS at 192.168.1.80 and thus my linux client would not function. As soon as I removed 192.168.1.80 from /etc/resolv.conf everything was as it should be. I hope that you, reading this, saves some hours worth of debugging. If you do, drop me a line/mail/beer :-)

Utilizing Seagate 7200.12 drives in an MSA20

Wednesday, February 2nd, 2011

About a year ago, I upgraded an MSA20 with non-HP drives. 1TB drives (7200.11 series) made by Seagate to be precise. Here one year later, the first drives start to fail. Looking for replacements we had a hard time finding the 7200.11 series drives. We then bought some 1TB 7200.12 drives.

And they work just fine……

Same model number, just different firmware as seen from the MSA20 (CC46 vs CC38):

physicaldrive 1:7
Box: 1
Bay: 7
Status: OK
Drive Type: Data Drive
Interface Type: SATA
Size: 1000.2 GB
Firmware Revision: CC46
Serial Number:             9VPB04V3
Model: Seagate ST31000528AS
SATA NCQ Capable: False

physicaldrive 1:8
Box: 1
Bay: 8
Status: OK
Drive Type: Data Drive
Interface Type: SATA
Size: 1000.2 GB
Firmware Revision: CC38
Serial Number:             9VP4D1F1
Model: Seagate ST31000528AS
SATA NCQ Capable: False

Graphing data obtained from the zyxel zynos ras interface in cacti

Monday, December 27th, 2010

After a brief IRC session on ADSL and noise levels with some former colleagues, I decided to graph the line quality of my ADSL connection using cacti. This blog post will briefly explain how to graph any data that can be obtained from the zyxel zynos ras interface. The data will be graphed using cacti and this blog assumes that a working cacti installation already is running.

The task at hand can be split into two:

  1. Obtaining data from a zyxel device (a P-2602R in my case)
  2. Graphing the data in cacti

Obtaining data from a zyxel device

I attacked the first problem by doing an snmpwalk of the zyxel device. A normal consumer zyxel ADSL router like the P-2602R will export two MIB trees:

  1. The normal iso.3.6.1.2.1 tree
  2. The private iso.3.6.1.4.1.890 tree

This can be seen by doing a normal SNMP walk of the device:

edison%  snmpwalk -v1 -c public 192.168.1.1 | head -2
iso.3.6.1.2.1.1.1.0 = STRING: "P-2602R-D1A"
iso.3.6.1.2.1.1.2.0 = OID: iso.3.6.1.4.1.890

A quick browse of the two MIB trees made it clear that not all values and parameters inside zynos was exported through SNMP.  I had to find another way of obtaining the values that I needed.

Besides utilizing SNMP one, can make a telnet session to the zyxel device, whereby you end up at a RAS prompt. From there you can interface and control a zyxel device in great detail. You will probably need a password for this to work. Living in denmark, having telenor as my ISP,  it is actually fairly easy as I, as  a customer, has access to all the information needed, ie. ipaddress of the ADSL router, the password and port information. Using this information, I logged into the router

telnet 192.168.1.1 23023
Trying 192.168.1.1…
Connected to 192.168.1.1.
Escape character is ‘^]’.
Password: **********

Copyright (c) 1994 – 2008 ZyXEL Communications Corp.

ras&gt;

From there it was fairly easy to find the information that I was looking for

ras&gt; wan adsl linedata near
noise margin downstream: 22 db
output power upstream: 15 db
attenuation downstream: 12 db

Now I just needed be able to do this automatically. I used the unix tool expect in the form of the nice and easy to use Expect.pm perl module. After 15-20 minutes of coding, I ended up with a little script that will fetch whatever values from the zynos ras prompt your heart desires in one go. Example usage of the script (XXXXXXX denotes the secret password)

edison% ./query_zynos_ras.pl 192.168.1.1 23023 XXXXXXXX "wan adsl  linedata near" "noise margin downstream:" "attenuation downstream:"

noise:22 attenuation:12

Graphing the data in cacti

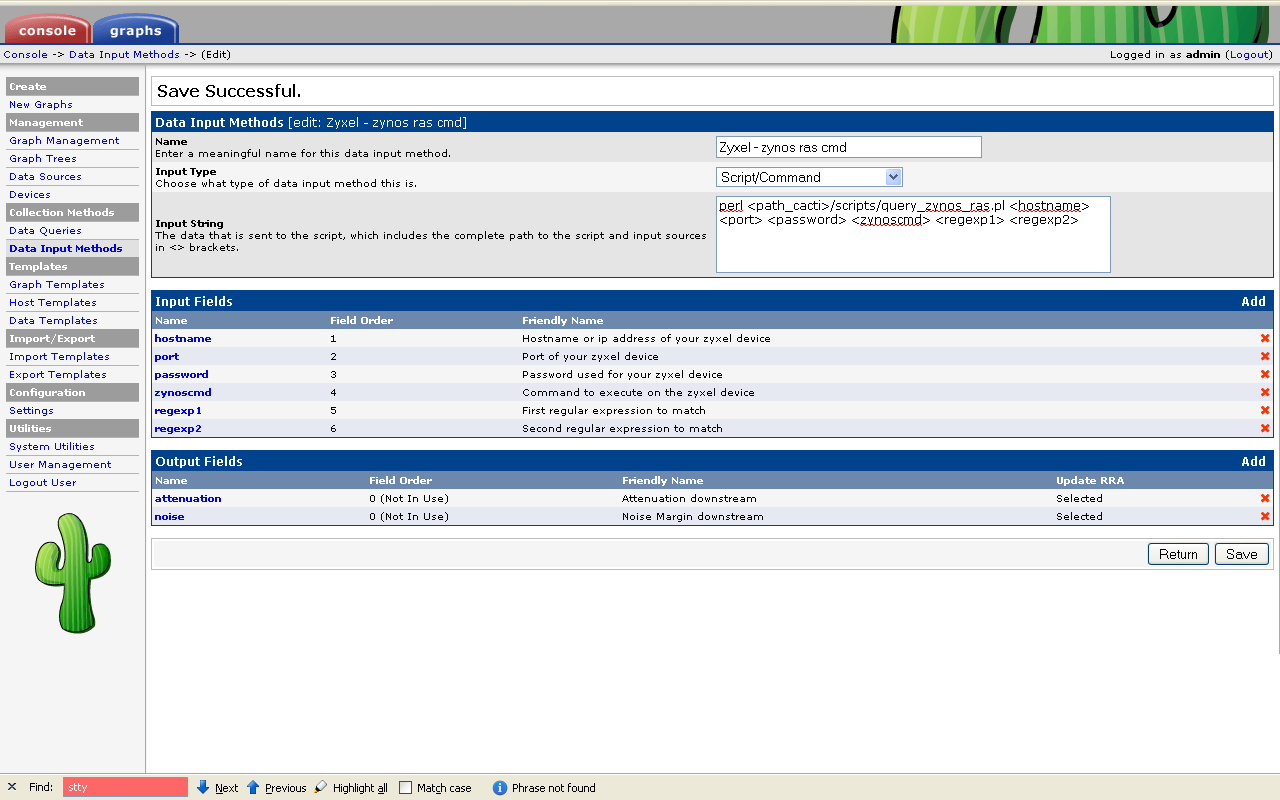
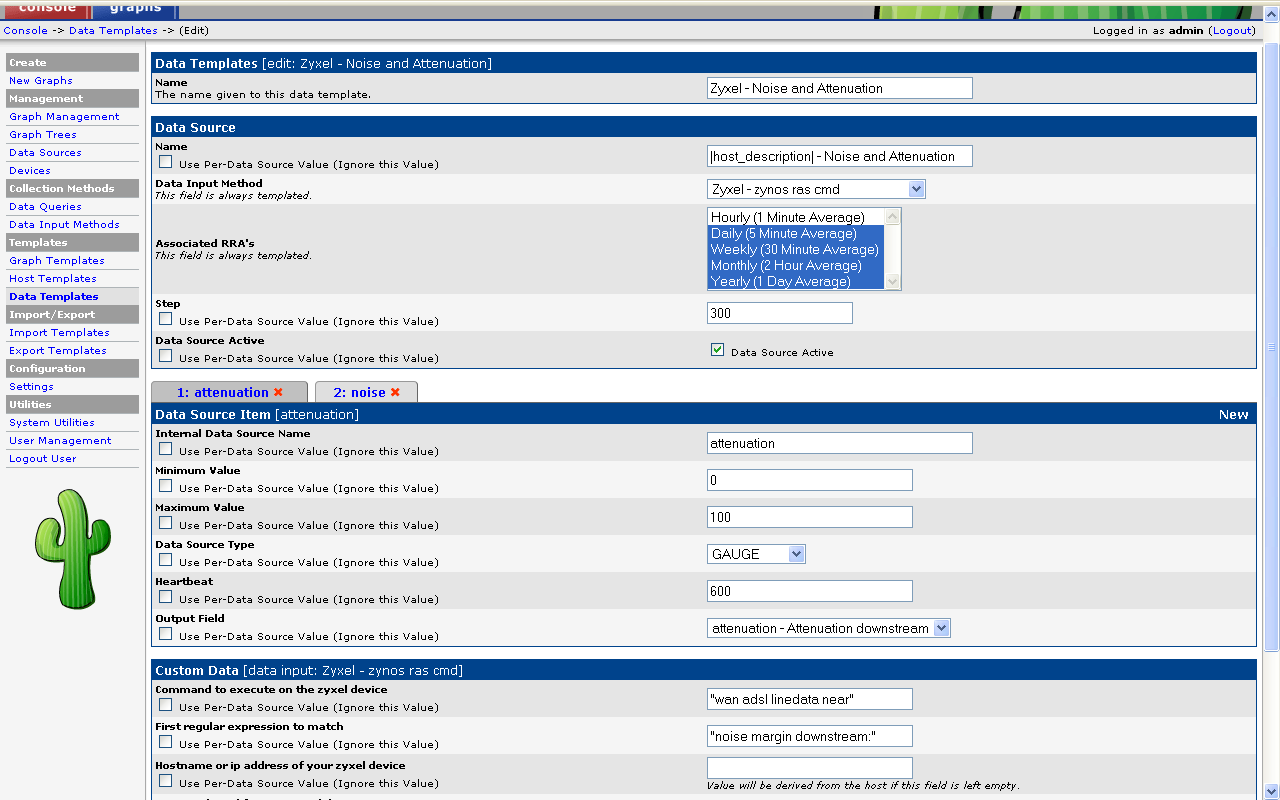
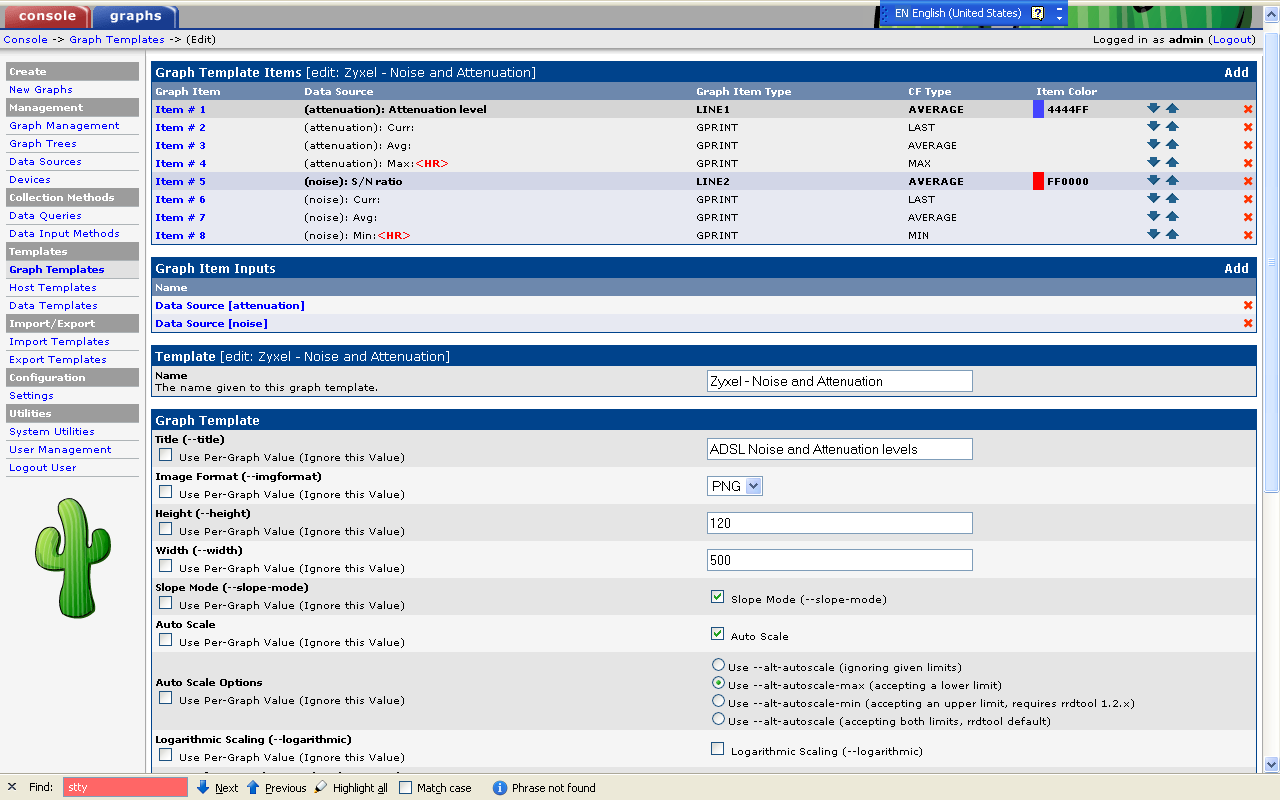
Now that the data collection had been scripted the data had to be graphed in cacti. This involved defining

  • a data input method
  • a data template and
  • a graph template.

Quick and dirty screendumps on how to do it:

data input method

data template

graph template

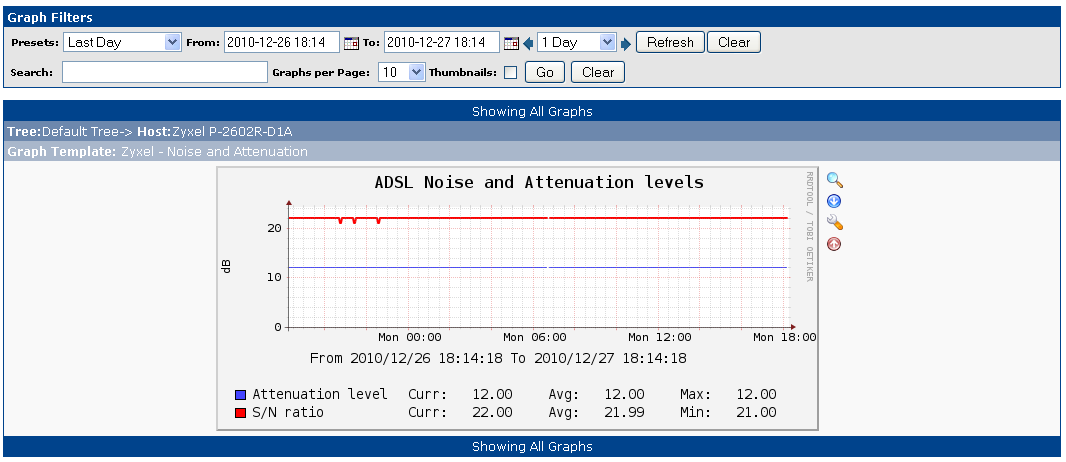
After a day or so, you get a graph like the following

From the graph I could see that my telephone line is very stable and that I should be able to get far better speeds if my current employer would pay telenor to provide it to me.

Fixing dying ssh connections through iptables based firewalls

Wednesday, December 22nd, 2010

I recently came across a setup where my ssh connections were torn down when inactive. This is a great nuisance for a sysadmin. The reasons are quite well known. Out of the box, the Linux iptables code will tear down/close inactive TCP connections after 30 minutes of inactivity. The TCP implementation in the Linux kernel however, normally default to a TCP keep-alive timer of 120 minutes.

Thus the iptables code will take the ssh connection down one and a half hour before the TCP stack starts to try to keep the connection alive. Not very handy to say the least. To remedy the situation and keep your ssh sessions alive even though the are inactive, a possible solution could be to lower the Linux TCP keep-alive timer to ie 15 minutes. You would do that with

echo 900 > /proc/sys/net/ipv4/tcp_keepalive_time

All done. Not rocket science at all, just a little useful piece of information.

About growing logical volumes, md devices, partitions and filesystems in Ubuntu 10.10

Monday, November 15th, 2010

Recently I found myself in a situation, where I was running out of space in my server. Luckily for me, the disks was not 100% utilized. On the positive side, that meant, that I had the possibility to extend my system without buying new hardware. On the negative side it meant that I had to fool around with my precious data. Normally I do this for a living, but on my job it is just customer data. In this case we are talking about pictures of the kids and wife….. Much more important stuff for sure :-)

So my setup

  • / mounted as an ext3 fs on top of an logical volume (LVM2) called lvroot in vg000
  • /boot mount as an ext3 fs directly on /dev/md0
  • vg00 has one physical volume called /dev/md1
  • /dev/md0 is a RAID1 device on /dev/sda1 and /dev/sdb1
  • /dev/md1 is a RAID1 device on /dev/sda2 and /dev/sdb2

Here is the business case: both /dev/sda2 and /dev/sdb2 was not fully utilized. /dev/sdb2 had 67GB unused and /dev/sda2 had around 250GB unused. That meant that I could resize / with 67GB up front, for free!

I startet out with this situation

root@edison:~# df -k /
Filesystem             1K-blocks      Used Available Use% Mounted on
/dev/mapper/vg000-root 240149008 232617156   2652288  99% /

So how do you do this, in an easy, controlled way, without taking time consuming backups of hundres of GB (I do make backups, so it is very easy for me to write this ;-) )? You can do it like I did below.

<DISCLAIMER>This is best-effort, free of charge information.  If you end up breaking your system into several pieces, it is your responsibility. I can and will not be held liable. You get to keep the pieces yourself! That will hopefully teach you not to trust ‘expert advice’ from some random internet place run by a random danish guy.</DISCLAIMER>

That said. Lets do some storage work

# First I fail /dev/sdb2
mdadm --fail /dev/md1 /dev/sdb2

# Then I remove /dev/sdb2 from the running config
mdadm --remove /dev/md1 /dev/sdb2
# Then we delete and recreate /dev/sdb2 with a larger size.
# Do a print beforehand to see the "before" values
fdisk /dev/sdb
Command (m for help): p

Disk /dev/sdb: 320.1 GB, 320072933376 bytes
255 heads, 63 sectors/track, 38913 cylinders
Units = cylinders of 16065 * 512 = 8225280 bytes
Sector size (logical/physical): 512 bytes / 512 bytes
I/O size (minimum/optimal): 512 bytes / 512 bytes
Disk identifier: 0xa286eb78

Device Boot      Start         End      Blocks   Id  System
/dev/sdb1   *           1          26      208813+  fd  Linux raid autodetect
/dev/sdb2              27       30400   243979155   fd  Linux raid autodetect
# delete it
Command (m for help): d
Partition number (1-4): 2
# recreate with larger size and same type
Command (m for help): n
Command action
 e   extended
 p   primary partition (1-4)
p
Partition number (1-4): 2
First cylinder (27-38913, default 27):
Using default value 27
Last cylinder, +cylinders or +size{K,M,G} (27-38913, default 38913):
Using default value 38913
Command (m for help): t
Partition number (1-4): 2
Hex code (type L to list codes): fd
Changed system type of partition 2 to fd (Linux raid autodetect)
# Write it
Command (m for help): w

If you are so lucky that you are not using the device for anything else (ie booting), the kernel can reread the modified partition table on the live system. If the system do use the device for something, you have to reboot the system. Which I had to do. Which I then did… By issuing the command:

reboot

When the server came back up, I assembled the /dev/md1 device again and waited for a resync. I speeded up the resync quite significantly by issuing the echo commands, which basically just tell md that it has to work as hard as it possibly can.

# Assemble again
mdadm --add /dev/md1 /dev/sdb2
# Speed up rebuild process
 echo 900000 > /proc/sys/dev/raid/speed_limit_min
 echo 900000 > /proc/sys/dev/raid/speed_limit_max
# watch status, eat pizze, drink a beer
watch cat /proc/mdstat

When the resync was done, I did it all over, replacing /dev/sdb2 with /dev/sda2.  After that,  I had grown the underlying partitions on my two drives, but both md and lvm had not noticed anything.

I made sure everything worked fine  and went onto the  next step – growing an md device on the fly.

# See current md device stats
root@edison:~# mdadm -D /dev/md1
/dev/md1:
 Version : 00.90
 Creation Time : Sat Jul 31 16:45:08 2010
 Raid Level : raid1
 Array Size : 243979072 (232.68 GiB 249.83 GB)
 Used Dev Size : 243979072 (232.68 GiB 249.83 GB)
 Raid Devices : 2
 Total Devices : 2
Preferred Minor : 1
 Persistence : Superblock is persistent

 Update Time : Mon Nov 15 20:16:27 2010
 State : clean
 Active Devices : 2
Working Devices : 2
 Failed Devices : 0
 Spare Devices : 0

 UUID : f510bad0:59d990c1:19dfcc76:62eb3300
 Events : 0.204498

 Number   Major   Minor   RaidDevice State
 0       8        2        0      active sync   /dev/sda2
 1       8       18        1      active sync   /dev/sdb2

# Grow the device to the max - took about 1-2 seconds, but see below
root@edison:~#  mdadm --grow --size=max /dev/md1
# Recheck the device stat.
root@edison:~# mdadm -D /dev/md1
/dev/md1:
 Version : 00.90
 Creation Time : Sat Jul 31 16:45:08 2010
 Raid Level : raid1
 Array Size : 312359744 (297.89 GiB 319.86 GB)
 Used Dev Size : 312359744 (297.89 GiB 319.86 GB)
 Raid Devices : 2
 Total Devices : 2
Preferred Minor : 1
 Persistence : Superblock is persistent

 Update Time : Mon Nov 15 20:17:21 2010
 State : active, resyncing
 Active Devices : 2
Working Devices : 2
 Failed Devices : 0
 Spare Devices : 0

 Rebuild Status : 78% complete

 UUID : f510bad0:59d990c1:19dfcc76:62eb3300
 Events : 0.204503

 Number   Major   Minor   RaidDevice State
 0       8        2        0      active sync   /dev/sda2
 1       8       18        1      active sync   /dev/sdb2

Notice how the drive went into sync state. Looking at mdstat confirms that. You can use the device before the mirroring is done. … or you can play it safe and wait. I decided to go ahead and use it before the sync was done. Living on the edge … this is not work. Only something your wife will never forgive you for ;-)

root@edison:~# cat /proc/mdstat
Personalities : [linear] [multipath] [raid0] [raid1]
[raid6] [raid5] [raid4] [raid10]

md1 : active raid1 sda2[0] sdb2[1]
 312359744 blocks [2/2] [UU]
 [===============>.....]  resync = 78.6% (245745600/312359744)
finish=21.2min speed=52265K/sec

md0 : active raid1 sdb1[1] sda1[0]
 208704 blocks [2/2] [UU]
unused devices: <none>

Next step. Making lvm aware of the change. Quite easy actually:

# Before
root@edison:~# pvdisplay /dev/md
 --- Physical volume ---
 PV Name               /dev/md1
 VG Name               vg000
 PV Size               232,68 GiB / not usable 832,00 KiB
 Allocatable           yes (but full)
 PE Size               4,00 MiB
 Total PE              59565
 Free PE               0
 Allocated PE          59565
 PV UUID               saiFOT-Dw2O-OnVv-rA4b-wZG3-OQHN-fFD1w

You then issue an pvresize on the pv  like this

root@edison:~# pvresize /dev/md1
 Physical volume "/dev/md1" changed
 1 physical volume(s) resized / 0 physical volume(s) not resized

And you end up with

root@edison:~# pvdisplay /dev/md1
 --- Physical volume ---
 PV Name               /dev/md1
 VG Name               vg000
 PV Size               297,89 GiB / not usable 2,62 MiB
 Allocatable           yes
 PE Size               4,00 MiB
 Total PE              76259
 Free PE               16694
 Allocated PE          59565
 PV UUID               saiFOT-Dw2O-OnVv-rA4b-wZG3-OQHN-fFD1wI

We are getting there? Now onto extending the volume. First peek at the current sizes/free space

root@edison:~# vgdisplay vg000
 --- Volume group ---
 VG Name               vg000
 System ID
 Format                lvm2
 Metadata Areas        1
 Metadata Sequence No  4
 VG Access             read/write
 VG Status             resizable
 MAX LV                0
 Cur LV                1
 Open LV               1
 Max PV                0
 Cur PV                1
 Act PV                1
 VG Size               297,89 GiB
 PE Size               4,00 MiB
 Total PE              76259
 Alloc PE / Size       59565 / 232,68 GiB
 Free  PE / Size       16694 / 65,21 GiB
 VG UUID               rL7lfw-H2FC-4ala-KVV3-bLIA-MbA9-co2n1O
root@edison:~# lvdisplay /dev/vg000/root
 --- Logical volume ---
 LV Name                /dev/vg000/root
 VG Name                vg000
 LV UUID                uDPn6b-AvyO-xH2n-zpXm-n0Xt-5g5n-aSdu4C
 LV Write Access        read/write
 LV Status              available
 # open                 1
 LV Size                232,68 GiB
 Current LE             59565
 Segments               1
 Allocation             inherit
 Read ahead sectors     auto
 - currently set to     256
 Block device           251:0

Then extend the volume

root@edison:~# lvextend -l 76259 /dev/vg000/root
Extending logical volume root to 297,89 GiB
Logical volume root successfully resized

One step left – resize the live filesystem

root@edison:~# resize2fs /dev/vg000/root
resize2fs 1.41.12 (17-May-2010)
Filesystem at /dev/vg000/root is mounted on /; on-line resizing required
old desc_blocks = 15, new_desc_blocks = 19
Performing an on-line resize of /dev/vg000/root to 78089216 (4k) blocks.
The filesystem on /dev/vg000/root is now 78089216 blocks long.

How much did I gain:

root@edison:~# df -k /
Filesystem              1K-blocks      Used Available Use% Mounted on
/dev/mapper/vg000-root  307454080 232621080  68588172  78% /

Almost a walk in the park. I did actully run into a problem during this procedure. When I removed /dev/sdb2, grub would not reboot. Instead it gave me a grub rescue prompt.  I overcame this booting a rescue CD, starting up the system using that. I then added /dev/sdb2 into /dev/md1 from the rescue cd, waited for the mirroring and and rebooted again. When I did the same for /dev/sda2, grub was happy all along?! I have not bothered to figure out why grub misbehaved, I just put grub down as being like a teenager: unreliable and causing problems for no obvious reason ;-)